

How to Clean a Microwave: The Ultimate Step-by-Step Guide
A microwave is one of the most frequently used appliances in any kitchen, which also means it’s one of
A microwave is one of the most frequently used appliances in any kitchen, which also means it’s one of the quickest to collect splatters, stains, and lingering odours. Knowing how to clean a microwave properly doesn’t require harsh chemicals or hours of scrubbing. With a few household ingredients and the right technique, you can have it looking brand new in under 15 minutes. This guide walks through every method, step by step.
Why Cleaning Your Microwave Regularly Matters
A dirty microwave isn’t just unsightly. Built-up food residue can affect cooking efficiency, create unpleasant smells that transfer to future meals, and even encourage bacterial growth if left for extended periods. Grease splatters can also become harder to remove the longer they sit, turning a simple wipe-down into a much bigger task. Regular cleaning keeps the appliance hygienic, functioning properly, and free from lingering odours.
What You’ll Need
Before starting, gather a few simple supplies. Most of these are likely already in your kitchen cupboard:
- A microwave-safe bowl
- White vinegar or fresh lemon
- Water
- Baking soda (optional, for tougher stains)
- A soft cloth or sponge
- A toothbrush or small brush (for corners and vents)
- Dish soap
- A dry towel for finishing
Step-by-Step: How to Clean a Microwave with Vinegar
Vinegar is one of the most effective and natural ways to clean a microwave, as it loosens dried food particles using steam rather than scrubbing.
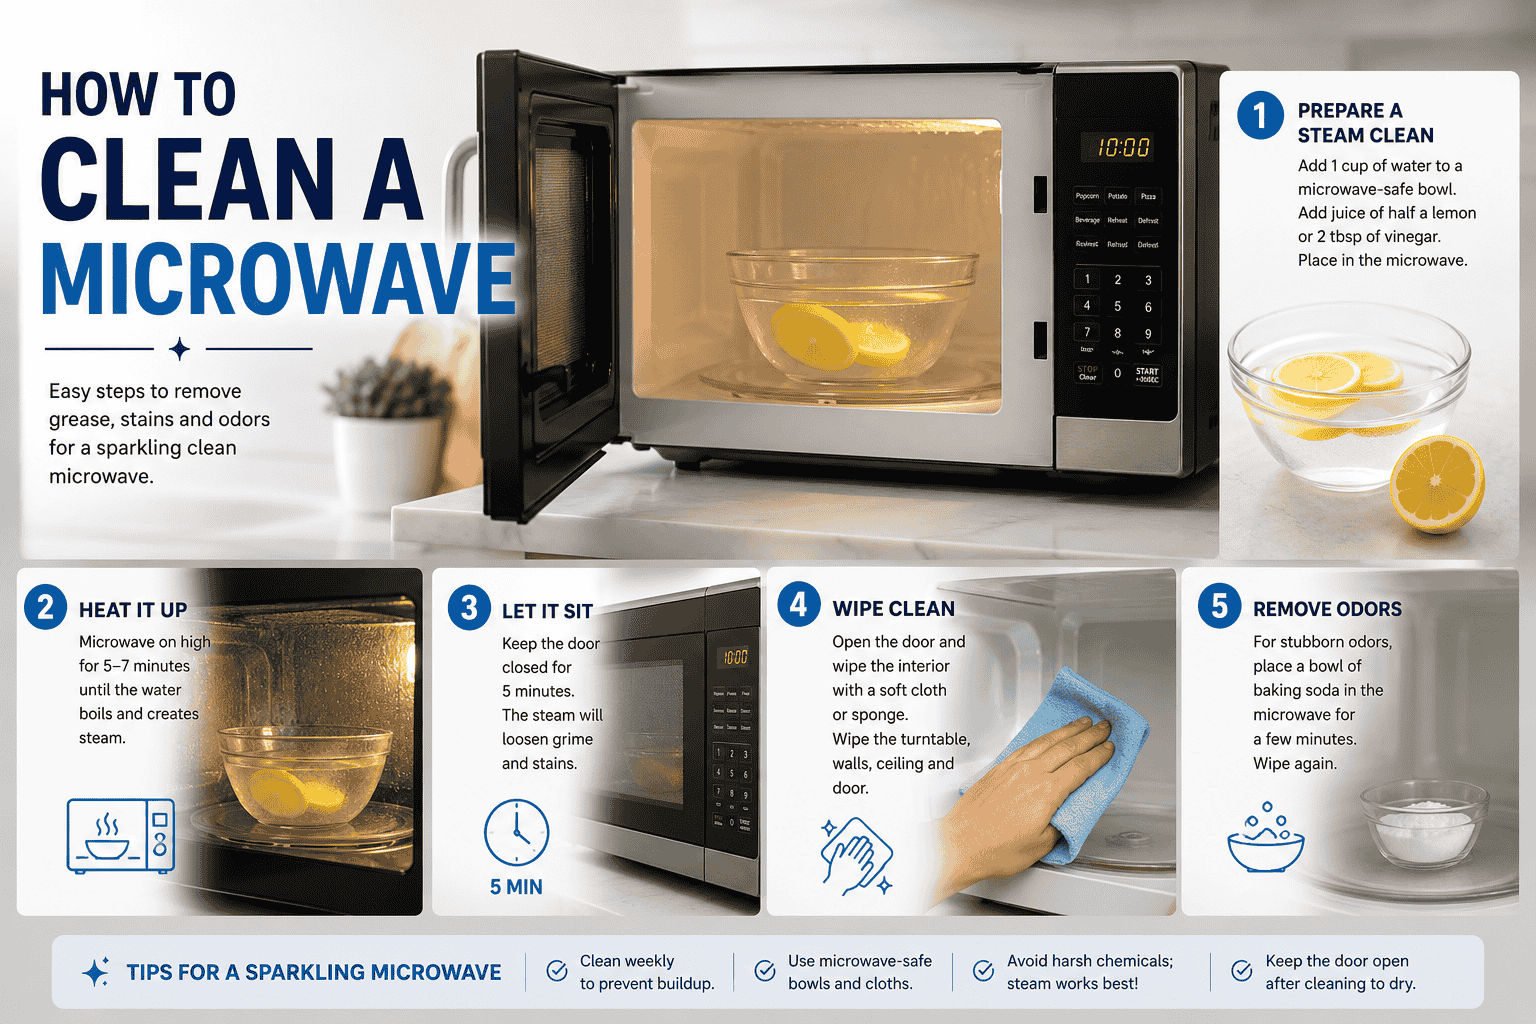
- Mix the solution. Combine 2 tablespoons of white vinegar with 1 cup of water in a microwave-safe bowl.
- Heat it up. Place the bowl in the microwave and heat on high for 3–5 minutes, or until the mixture is steaming and the window is visibly foggy.
- Let it sit. Leave the bowl inside the microwave for an additional 5 minutes without opening the door. The trapped steam continues to soften grime on the walls and ceiling.
- Wipe it down. Carefully remove the bowl, then wipe the interior with a soft cloth or sponge. Stains and splatters should lift away with minimal effort.
- Dry the interior. Use a dry towel to remove any remaining moisture and prevent streaking.
Step-by-Step: How to Clean a Microwave with Lemon
For a fresher scent alongside effective cleaning, lemon is an excellent alternative to vinegar.
- Slice a lemon into quarters and place it in a microwave-safe bowl with half a cup of water.
- Microwave on high for 3–4 minutes until steam builds up inside.
- Leave the door closed for 5 minutes to allow the steam to loosen grime.
- Wipe the interior with a cloth, using the leftover lemon water to tackle any stubborn spots.
- Finish by drying the inside thoroughly.
This method works particularly well for microwaves with persistent food odours, as the citrus naturally neutralises smells rather than masking them.
How to Clean a Microwave with Baking Soda
For dried, crusted stains that vinegar or lemon steam alone can’t fully remove, baking soda offers gentle abrasive power without scratching the interior surface.
- Make a paste using 2 tablespoons of baking soda mixed with a small amount of water.
- Apply directly to stained areas using a sponge or soft cloth.
- Let it sit for 5–10 minutes to break down the residue.
- Scrub gently in a circular motion, focusing on stubborn spots.
- Wipe clean with a damp cloth, then dry thoroughly.
This method is particularly effective on the microwave ceiling, where splatters tend to dry and harden over time.
How to Remove Burnt Smells from a Microwave
Burnt smells, often caused by overheated food or popcorn, can linger long after the mess itself has been cleaned. To tackle persistent odours:
- Place a bowl of water mixed with a tablespoon of baking soda inside the microwave and heat for 2–3 minutes.
- Leave the bowl inside with the door closed overnight if the smell is particularly strong.
- For a quicker fix, a bowl of water with a few drops of vanilla extract or lemon juice can help neutralise odours within a few hours.
- Wipe down all interior surfaces afterwards, as smells often linger on rubber seals and corners.
Cleaning the Microwave Turntable and Filter
The turntable, roller ring, and any vent filters require separate attention, as they often collect crumbs and grease that the main cleaning methods don’t reach.
- Remove the turntable and roller ring carefully.
- Wash with warm water and dish soap, as you would with any dish, using a sponge to remove built-up grease.
- Dry completely before placing back inside the microwave to avoid trapping moisture.
- Check for a removable filter (common in combination microwaves) and clean according to the manufacturer’s instructions, typically with warm soapy water.
Cleaning the Outside of a Microwave
The exterior, including buttons, handles, and the door seal, also needs regular attention since it’s touched frequently throughout the day.
- Wipe down the control panel and buttons with a damp cloth, avoiding excess moisture near electrical components.
- Clean the door seal and edges, where crumbs and grease commonly build up, using a damp cloth or soft brush.
- For stainless steel exteriors, a small amount of dish soap with water, followed by a microfibre cloth, helps avoid streaks and fingerprints.
- Don’t forget the handle and vents at the back or sides, which often collect dust over time.
How Often Should You Clean a Microwave
For best results, a quick wipe-down after any spill or splatter is recommended immediately. Beyond that:
- Light cleaning: Once a week for general wiping and odour prevention.
- Deep cleaning: Every 2–3 weeks using the vinegar, lemon, or baking soda method for a more thorough clean.
- Turntable and filter cleaning: Monthly, or sooner if heavily used for greasy foods.
Keeping to a consistent schedule prevents buildup from becoming difficult to remove and keeps the appliance smelling fresh.
Common Mistakes to Avoid When Cleaning a Microwave
- Using abrasive scrubbers or steel wool, which can scratch the interior coating and damage the appliance over time.
- Spraying cleaning solutions directly onto the control panel, which risks moisture seeping into electrical components.
- Skipping the turntable and roller ring, an area that’s frequently overlooked despite collecting significant grease and crumbs.
- Using too much liquid during the steam method, which can lead to excess dripping rather than effective steam cleaning.
- Ignoring the door seal, where mould and grime can build up unnoticed if not checked regularly.
Frequently Asked Questions
How do I clean a microwave fast?
The vinegar steam method is the quickest effective option, taking around 10 minutes total, including heating, steaming, and wiping down the interior.
Can I clean a microwave without vinegar?
Yes, lemon and water or a baking soda paste both work effectively as vinegar alternatives, particularly for tackling smells or stubborn stains.
Why does my microwave smell even after cleaning?
Lingering smells are often trapped in the door seal or vents rather than the main interior. A baking soda and water solution left inside overnight typically resolves this.
Is it safe to use dish soap inside the microwave?
Yes, a small amount of dish soap diluted in water is safe for wiping down the interior, though it should always be followed by a clean water rinse and thorough drying.
How do I clean burnt popcorn smell from a microwave?
A bowl of water with baking soda or vanilla extract, heated briefly and then left inside with the door closed, is the most effective way to neutralise burnt popcorn odours.
Final Thoughts
Cleaning a microwave doesn’t need to be a chore. With simple household ingredients like vinegar, lemon, or baking soda, along with a consistent weekly routine, your microwave can stay spotless, odour-free, and fully functional for years. A few minutes of regular maintenance goes a long way toward avoiding stubborn, hardened stains down the line.