




How to Make Cold Foam at Home (Every Method, Every Milk)
You’ve had it at Starbucks. You’ve paid £5–6 for a drink that took the barista forty seconds to make.
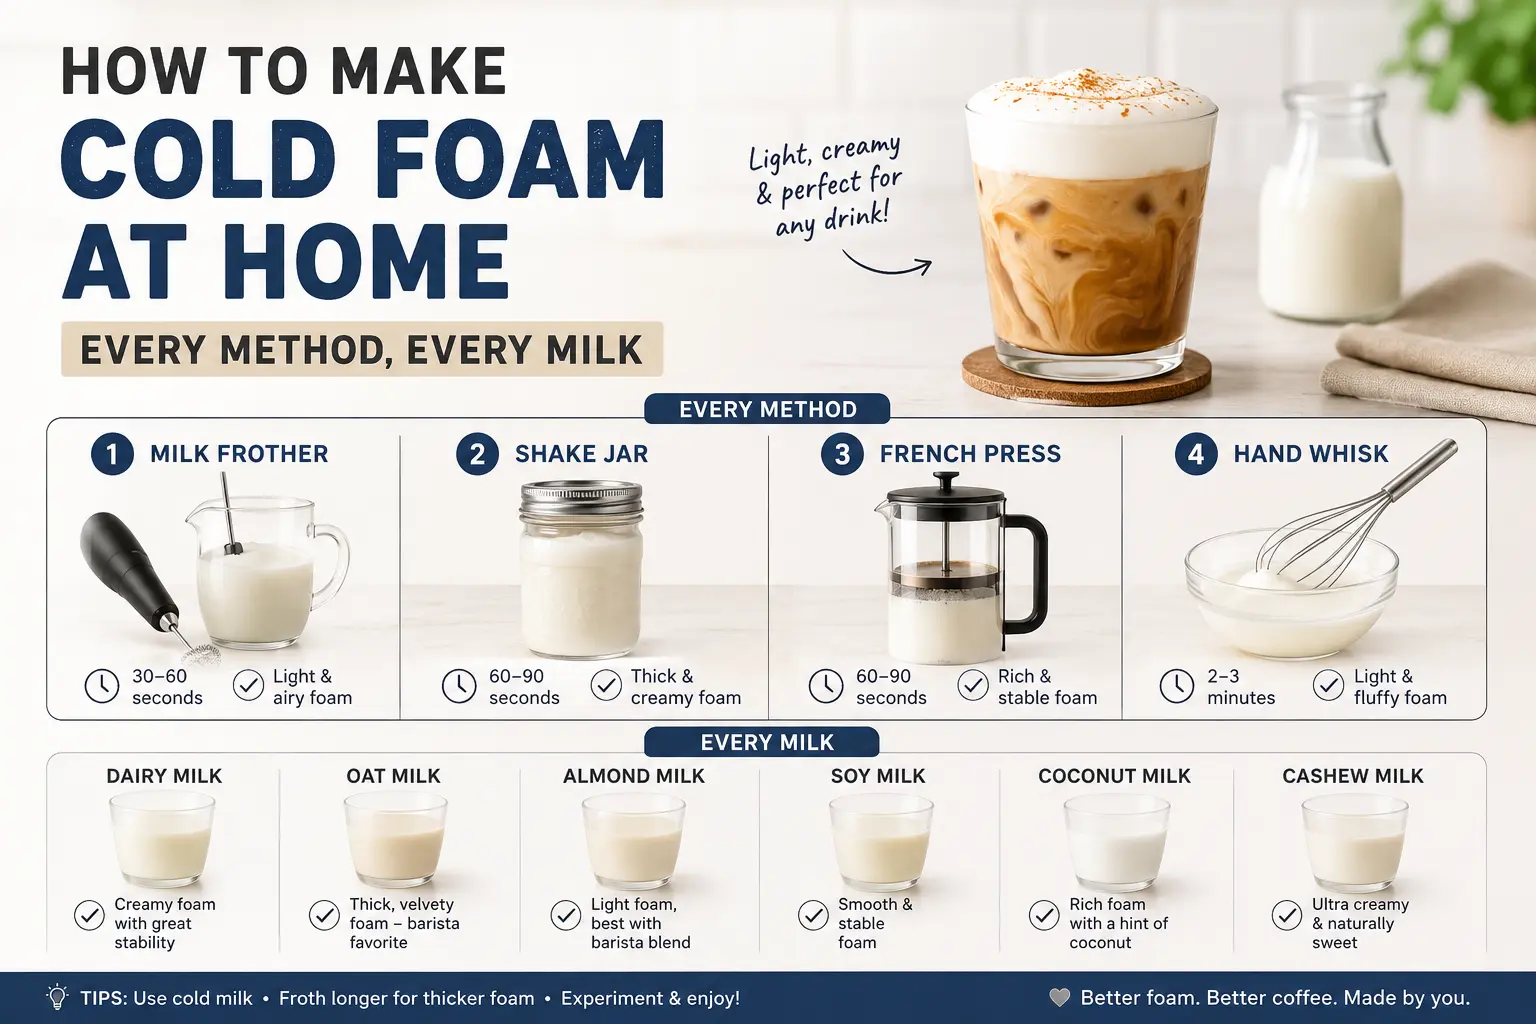
You’ve had it at Starbucks. You’ve paid £5–6 for a drink that took the barista forty seconds to make. And somewhere in the back of your mind, you’ve thought: I could probably do that myself.
You can. And it’s easier than you think.
Cold foam is one of those coffee-shop tricks that looks fancy but is genuinely simple once you know the method. No expensive machine. No barista training. Just cold milk, the right technique, and about 30 seconds of your time.
This guide covers everything — what cold foam actually is, every method to make it (with and without a frother), which milks work best, how to flavour it, and the common mistakes that turn silky foam into sad bubbles.
What Is Cold Foam, Exactly?
Cold foam is milk that’s been aerated at cold temperature until it becomes thick, creamy, and light enough to float on top of an iced drink. Unlike steamed milk foam that sits on a hot latte, cold foam is made by frothing heavy cream, milk, or a combination of both until the mixture is thick, silky, and easy to pour.
The result is that cloud-like layer you see cascading slowly into cold brew — it adds creaminess, a hint of sweetness, and a texture that makes even a basic iced coffee feel like a proper treat.
The key word is cold. When the milk is cold, the proteins are tighter and less flexible — and that’s exactly what helps them trap air bubbles and hold them in place. Warm milk won’t give you the same result.
What You Need
Ingredients (The Classic Ratio)
The 3–2–1 method takes the guesswork out of cold foam:
- 3 tbsp heavy cream
- 2 tbsp milk (whole or 2%)
- 1 tbsp syrup of your choice
This ratio gives you foam that’s creamy enough to float, flavourful enough to taste, and light enough not to overwhelm your drink. You can use just milk if you want something lighter, or just cream if you want it richer — but the combination gives the best balance.
Equipment Options
You don’t need anything fancy. Here’s what works, ranked from easiest to most effort:
| Method | Equipment | Time | Result |
|---|---|---|---|
| Handheld frother | Electric wand (~£8–10) | 15–20 sec | Best — smooth and consistent |
| Blender / immersion blender | Any blender | 20–30 sec | Excellent for larger batches |
| French press | Standard French press | 30 sec | Surprisingly good and thick |
| Mason jar / lidded bottle | Any jar | 45–60 sec | Works well, denser foam |
| Hand whisk | Whisk | 60–90 sec | Works, requires effort |
How to Make Cold Foam Step by Step
Method 1: Handheld Frother (Easiest & Best)
This is the method most people settle on because a handheld frother gets you 90% of the way there on its own.
- Combine your cream, milk, and syrup in a small glass or jar — something narrow works better than a wide bowl.
- Submerge the frother just below the surface of the liquid.
- Froth the mixture for 15–25 seconds until light and foamy, slowly pulling the wand towards the top of the milk as it thickens.
- Stop when it’s thick but still pourable — you want soft peaks, not stiff whipped cream.
- Pour immediately over your iced coffee or cold brew.
Pro tip: Don’t over-whip your foam. You’re going for soft, pourable peaks, not stiff whipped cream. Stop as soon as it’s thickened up and silky.
Method 2: French Press (No Frother Needed)
This is the best no-frother option and produces impressively thick foam.
- Pour your cold milk (and any syrup or flavouring) into a clean French press.
- Pump the plunger rapidly for about 30 seconds — it creates a surprisingly thick foam.
- Let it settle for 10 seconds, then spoon or pour the foam over your drink.
Method 3: Mason Jar / Lidded Bottle (Zero Equipment)
Add your milk to a lidded jar, seal it tightly, and shake vigorously for 30–60 seconds. The motion creates bubbles that form a thick foam.
The foam from this method is a little denser and chunkier than frother foam, but it works perfectly well. Just be careful not to overshake or you’ll head toward whipped cream territory.
Method 4: Blender or Immersion Blender
Great for making a larger batch.
- Add your milk and flavourings to a blender.
- Blend on medium-high for 20–30 seconds.
- The foam will be very airy — spoon it gently over your drink.
Which Milk Works Best for Cold Foam?
Milk choice makes a bigger difference than most people realise. Fat content matters — lower-fat milk gives you a cleaner shot at building stable foam because there’s less fat interfering with the protein structures. The result is thicker, tighter foam that actually sits on top of your drink instead of dissolving into it.
Here’s the full breakdown:
| Milk Type | Foam Quality | Notes |
|---|---|---|
| Skim / nonfat milk | Best — thickest, most stable | Classic cold foam texture, holds longest |
| 2% milk | Very good | Slightly creamier, still holds well |
| Whole milk | Good | Richer flavour, slightly looser foam |
| Heavy cream | Rich and thick | Mix with milk or it turns into whipped cream |
| Oat milk (Barista edition) | Good — best dairy-free option | Barista-edition oat milk has added stabilisers that help the foam hold shape Dilworth Coffee |
| Regular oat milk | Decent | Softer, airier foam that dissipates quicker |
| Almond milk | Poor | Tends to be too thin and “bubbly” rather than “foamy” Dilworth Coffee |
| Coconut milk (full fat) | Good | Typically yields thick and frothy foam that holds its shape well Rich’s |
The classic Starbucks sweet cream cold foam uses a combination of heavy cream and whole milk — which gives it that rich, velvety texture. For a lighter everyday version, skim or 2% milk alone works brilliantly.
Cold Foam Flavour Ideas
The base recipe stays the same — just swap or add to the syrup. Start with 1 tablespoon of your chosen syrup and adjust to taste, since some syrups run sweeter than others.
Classic flavours:
- Vanilla bean — vanilla syrup or a dash of vanilla extract
- Brown sugar cinnamon — brown sugar syrup + ⅛ tsp cinnamon
- Salted caramel — caramel syrup + a tiny pinch of salt
- Hazelnut — hazelnut syrup, pairs beautifully with espresso
Trending in 2026:
- Pistachio — pistachio syrup for a nutty, lightly sweet foam
- Lavender — lavender syrup for a floral, café-style finish
- Maple — pure maple syrup for a warm, cosy flavour
- Matcha — whisk ½ tsp matcha into your milk before frothing
- Pumpkin spice — pumpkin spice syrup + a pinch of cinnamon
Dairy-free combination that actually works:
3 tbsp dairy-free heavy cream + 2 tbsp Barista Edition oat milk + 1 tbsp brown sugar cinnamon syrup — all the flavour, none of the dairy, and a texture that rivals the real deal.
Common Cold Foam Mistakes (and How to Fix Them)
Foam is too watery and won’t hold
You’ve likely used a low-fat or thin milk without enough protein. Switch to whole milk, skim milk, or add a splash of heavy cream. Also check your milk is properly cold — even slightly warm milk collapses quickly.
Foam turned into whipped cream
You over-whipped, or used too much heavy cream. Reduce the cream ratio and stop frothing earlier. You want pourable consistency, not stiff peaks.
Foam sinks straight into the drink
Pour it slowly over the back of a spoon to help it float. If it still sinks, your foam isn’t thick enough — froth for a few more seconds next time.
Foam tastes bland
Always add your syrup or flavouring before frothing, not after, so it distributes evenly through the foam.
Bubbles are large and pop quickly
This often happens when using low-fat or plant-based milk with insufficient protein. Opt for whole milk or fortified non-dairy options for better results.
How to Store Cold Foam
Cold foam is best enjoyed immediately. Do not store for later as the foam will deflate. If you need to prep slightly ahead, you can refrigerate the mixture briefly and re-froth it before serving — but it will always look and taste best when fresh.
The syrup, however, is completely make-ahead friendly. Homemade vanilla simple syrup lasts a few weeks in the refrigerator — make a batch once and your cold foam is ready in under a minute any morning.
What to Put Cold Foam On
Cold foam isn’t just for cold brew. Once you’ve made a batch, try it on:
- Iced coffee or cold brew — the classic pairing
- Iced lattes — vanilla or caramel cold foam over a shot of espresso and ice
- Iced matcha — vanilla cold foam over matcha is a genuinely excellent combination
- Iced chai — adds a creamy, cooling layer to spiced chai
- Hot coffee — yes, it works on hot drinks too; add it carefully and let it melt slowly into the drink
Frequently Asked Questions
What is the easiest way to make cold foam at home?
A handheld electric frother is the easiest method — it costs under £10 and produces café-quality cold foam in 15–20 seconds. If you don’t have one, a French press or lidded jar works well too.
Can I make cold foam without a frother?
Yes. A French press creates surprisingly thick foam when you pump the plunger rapidly for 30 seconds, and a lidded jar shaken vigorously also works. A hand whisk is a backup option but requires more effort.
What milk makes the best cold foam?
Skim milk produces the thickest, most stable foam because lower fat content allows proteins to trap air more effectively. For a richer, creamier result, mix heavy cream with whole or 2% milk.
Can I make dairy-free cold foam?
Yes — barista-edition oat milk is your best bet. It contains stabilisers that help it foam like dairy milk. Regular oat milk also works but gives a softer, less stable result.
Why does my cold foam keep sinking?
It’s either not thick enough or your drink is too warm. Froth a bit longer, make sure your milk is properly cold, and pour the foam slowly over the back of a spoon to help it float.
How long does cold foam last once made?
Cold foam is best used immediately. It will begin deflating within minutes, so make it right before serving and don’t try to store it.
How much cold foam should I use per drink?
About 2–4 tablespoons is the typical amount for a single drink. Some people like more — it’s entirely personal preference.
Is cold foam the same as whipped cream?
No. Whipped cream is heavily aerated cream whipped to stiff peaks. Cold foam is lighter, pourable, and made with a combination of milk and cream — it sits on top of a drink but gradually incorporates into it rather than staying firm.
Final Thoughts
Making cold foam at home takes about a minute, costs a fraction of what you’d pay at a coffee shop, and gives you complete control over flavour and sweetness. Once you’ve nailed the 3–2–1 ratio and found your go-to milk, you’ll wonder why you ever paid extra for it.
Start with a handheld frother and simple vanilla syrup. Get comfortable with the texture you’re aiming for. Then experiment — brown sugar cinnamon, pistachio, lavender, matcha — the combinations are genuinely endless.