



HOW TO REPLACE A LIGHT SWITCH
Replacing a standard light switch is one of the most approachable electrical projects a homeowner can take on. It
Replacing a standard light switch is one of the most approachable electrical projects a homeowner can take on. It typically takes about fifteen minutes, requires only a screwdriver and a voltage tester, and doesn’t call for an electrician in the vast majority of cases. It does, however, involve live household wiring, which means a few safety steps aren’t optional the way they might be for a purely mechanical repair.
This guide walks through the full process, from confirming the power is actually off to reconnecting the new switch correctly the first time.
BEFORE YOU START — SAFETY ISN’T OPTIONAL HERE
Unlike most fixes covered on this site, this one involves working near live wiring, so a few rules matter more than usual.
Always turn off the breaker for that circuit before opening the switch box. Don’t rely on the wall switch itself being in the “off” position as your only safeguard.
Confirm with a voltage tester before touching any wires, even after flipping the breaker. Breaker panel labels are wrong or outdated more often than most people expect, especially in older homes that have had electrical work done over the years.
Take a photo of the existing wiring before disconnecting anything. This single habit is the best insurance against confusion when it’s time to reconnect the new switch.
A basic non-contact voltage tester costs under fifteen dollars and is genuinely worth owning for any electrical project around the house. It removes the guesswork from “is this actually off,” which is exactly the question you don’t want to get wrong.
WHAT YOU’LL NEED
A replacement switch matched to the correct type. Single-pole, three-way, or dimmer switches are not interchangeable, so confirm which type you’re replacing before buying.
A flathead and a Phillips screwdriver.
A non-contact voltage tester.
Wire strippers, only if the existing wire ends look damaged, corroded, or too short to work with safely.
STEP 1: TURN OFF THE POWER AND CONFIRM IT’S ACTUALLY OFF
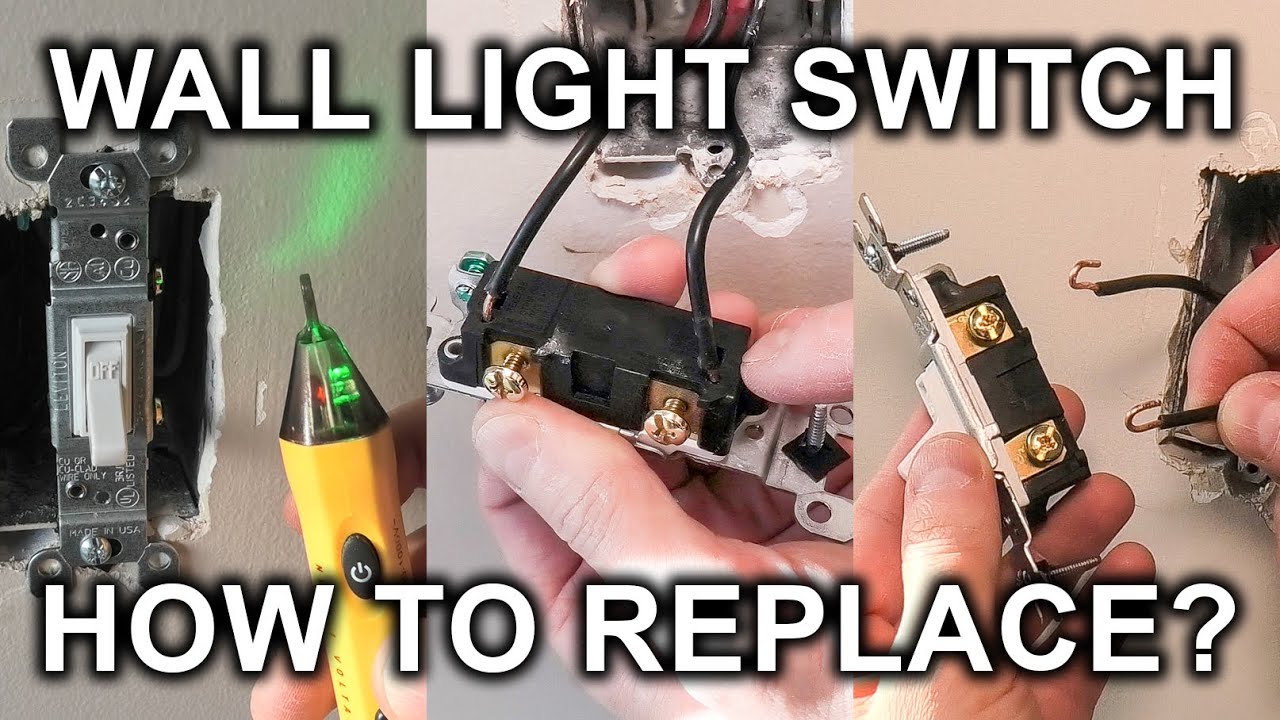
Flip the breaker that controls the circuit for that switch. Then go back to the switch, remove the cover plate, and test the wires directly with the voltage tester, not just the switch plate, before proceeding any further. This step takes thirty seconds and eliminates the single most common source of electrical mishaps during a project like this.
STEP 2: REMOVE THE OLD SWITCH
Unscrew the switch plate cover and set the small screws aside somewhere they won’t get lost.
Unscrew the switch itself from the electrical box, typically two screws, one near the top and one near the bottom.
Gently pull the switch out from the box and photograph the wire connections clearly before disconnecting anything.
Loosen each terminal screw and remove the wires one at a time, making a mental or written note of which terminal (usually a brass/gold-colored screw versus a darker one) each wire color was connected to.
STEP 3: CONNECT THE NEW SWITCH
Match each wire to the same terminal position it occupied on the old switch, using your reference photo.
The black (hot) wire typically connects to a brass-colored terminal screw.
The bare copper or green wire (ground) connects to the green ground screw, usually located at the bottom of the switch body.
If there’s a white wire present, check carefully whether it was capped off and unused (common in simple switch-loop wiring configurations) or actively connected. Replicate exactly what the original setup showed rather than assuming based on typical wiring conventions, since variations do exist.
Tighten each terminal screw firmly. A loose connection at this stage is one of the most common reasons a newly installed switch feels wobbly, doesn’t click firmly, or fails intermittently after installation.
STEP 4: REINSTALL AND TEST
Carefully fold the wires back into the electrical box, being mindful not to crimp or pinch any of the connections as you do.
Screw the switch back into the box, then reattach the cover plate.
Restore power at the breaker and test the switch to confirm it’s working correctly.
Pro tip: If the new switch doesn’t work and everything appears correctly connected, the most common culprit is a loose connection at the breaker panel itself, or a wire that isn’t fully seated under its terminal screw at the switch. Recheck both of these before concluding the switch itself is defective.
A NOTE ON THREE-WAY SWITCHES
If a single light fixture is controlled from two different locations, a common setup at the top and bottom of a staircase, or at both ends of a long hallway, you’re dealing with a three-way switch configuration. This setup includes an additional wire, commonly called the “traveler,” and the wiring logic is genuinely more involved than a standard single-pole switch.
The photograph-before-you-disconnect step becomes even more valuable here, since three-way wiring configurations can vary more between homes than standard single-pole setups. If you’re not fully confident tracing which wire does what, this is a reasonable project to hand off to a licensed electrician rather than working through by trial and error.
UNDERSTANDING SWITCH TYPES BEFORE YOU BUY
Not all replacement switches are created equal, and buying the wrong type is one of the most common reasons a swap doesn’t go smoothly.
Single-pole switches control a light from one location and are the simplest, most common type, identifiable by having just two brass terminal screws plus a ground.
Three-way switches have three terminal screws plus a ground, and are always installed in pairs to control a single fixture from two locations.
Four-way switches are used in setups where a light is controlled from three or more locations, and are installed between a pair of three-way switches.
Dimmer switches vary by the type of bulb they’re rated for. Always confirm LED compatibility if that’s what the fixture uses, since older dimmer designs were built around incandescent bulbs and can cause flickering or buzzing with modern LEDs.
Smart switches (Wi-Fi or hub-connected) generally require a neutral wire to be present in the switch box, which isn’t guaranteed in every home’s wiring, particularly older ones. It’s worth confirming this before purchasing a smart switch to avoid a frustrating return trip to the store.
COMMON WIRING COLORS AND WHAT THEY USUALLY MEAN
While the exact configuration can vary by home and by circuit, a few color conventions are consistent enough to be useful as a general reference.
Black wires are almost always hot (carrying live current) and connect to a brass terminal.
White wires are typically neutral, though in certain switch-loop configurations a white wire may actually be functioning as a hot wire. This is one of the more common sources of confusion, and is exactly why the reference photo of the original wiring matters so much.
Bare copper or green wires are ground connections and attach to the green grounding screw.
Red wires, when present, often indicate a secondary hot wire, common in three-way switch setups or certain ceiling fan installations with separate light and fan controls.
If any of the wiring in your box doesn’t match these general conventions, or looks like it’s been modified from a standard configuration, that’s a good signal to slow down and consider having an electrician confirm the setup rather than guessing.
TYPICAL COST AND TIME BREAKDOWN
| Switch Type | Part Cost | Time Required |
|---|---|---|
| Standard single-pole switch | $2–$10 | 10–15 minutes |
| Three-way switch (each, sold in pairs) | $5–$15 | 15–25 minutes |
| Dimmer switch (LED-rated) | $15–$35 | 15–20 minutes |
| Smart/Wi-Fi switch | $25–$60 | 20–40 minutes |
| Electrician service call (if needed) | $75–$200+ | — |
WHEN TO CALL AN ELECTRICIAN INSTEAD
While this is a genuinely approachable DIY project for most homeowners, a few situations are worth handing off to a licensed professional rather than continuing on your own.
Wiring that looks damaged, brittle, or shows exposed copper beyond the intended terminal connection point.
Aluminum wiring, common in some homes built during the 1960s and 1970s, which requires different connectors and installation techniques than standard copper wiring and carries its own specific fire-risk considerations if handled incorrectly.
Any switch box that feels warm to the touch, shows scorch marks, or has any smell of burning.
Three-way or four-way switch setups where you’re not fully confident tracing the existing wiring configuration.
Any situation where the breaker for that circuit isn’t clearly labeled and you can’t confidently confirm which breaker controls the switch you’re working on.
FREQUENTLY ASKED QUESTIONS
Do I need to turn off the entire electrical panel, or just one breaker? Just the single breaker controlling that specific circuit, but always verify with a voltage tester regardless, since panel labels are frequently mislabeled, outdated, or simply wrong, especially in homes that have had electrical work done by multiple people over the years.
Can I install a dimmer switch in place of a standard switch? In most cases, yes, as long as the bulbs in that fixture are dimmer-compatible (check the bulb packaging for LED dimming compatibility) and the circuit isn’t controlling something like a ceiling fan motor, which generally requires a specific fan-rated control rather than a standard dimmer.
What if there’s no ground wire in my switch box? This is fairly common in older homes built before grounded wiring became standard. Many switches will still function without a ground connection, but it’s worth having an electrician evaluate whether the box itself should be updated for safety, particularly if you’re planning to install a metal switch plate or a smart switch.
How do I know if my switch box has a neutral wire for a smart switch? Look for a bundle of white wires capped together and tucked into the back of the box, separate from the wires actually connected to the switch terminals. If no extra white wire is present at all, the box likely lacks a neutral, and a smart switch may not be a straightforward installation without additional wiring work.
Is it normal for a new switch to feel different from the old one? A slightly different click or resistance is normal between switch models and brands. What isn’t normal is a switch that feels loose, wobbly, or doesn’t click firmly into position, that usually indicates a mounting or connection issue worth rechecking rather than a simple difference in feel.