



HOW TO FIX A RUNNING TOILET
A running toilet is one of those problems that’s easy to ignore for weeks, until the water bill arrives.
A running toilet is one of those problems that’s easy to ignore for weeks, until the water bill arrives. The good news is that almost every case comes down to one of two inexpensive parts, and fixing either one takes about fifteen minutes with no special tools and no plumbing experience.
This guide walks through exactly how to diagnose which part is failing, how to replace it, and when, rarely, this is actually a job for a professional instead.
WHY TOILETS START RUNNING IN THE FIRST PLACE
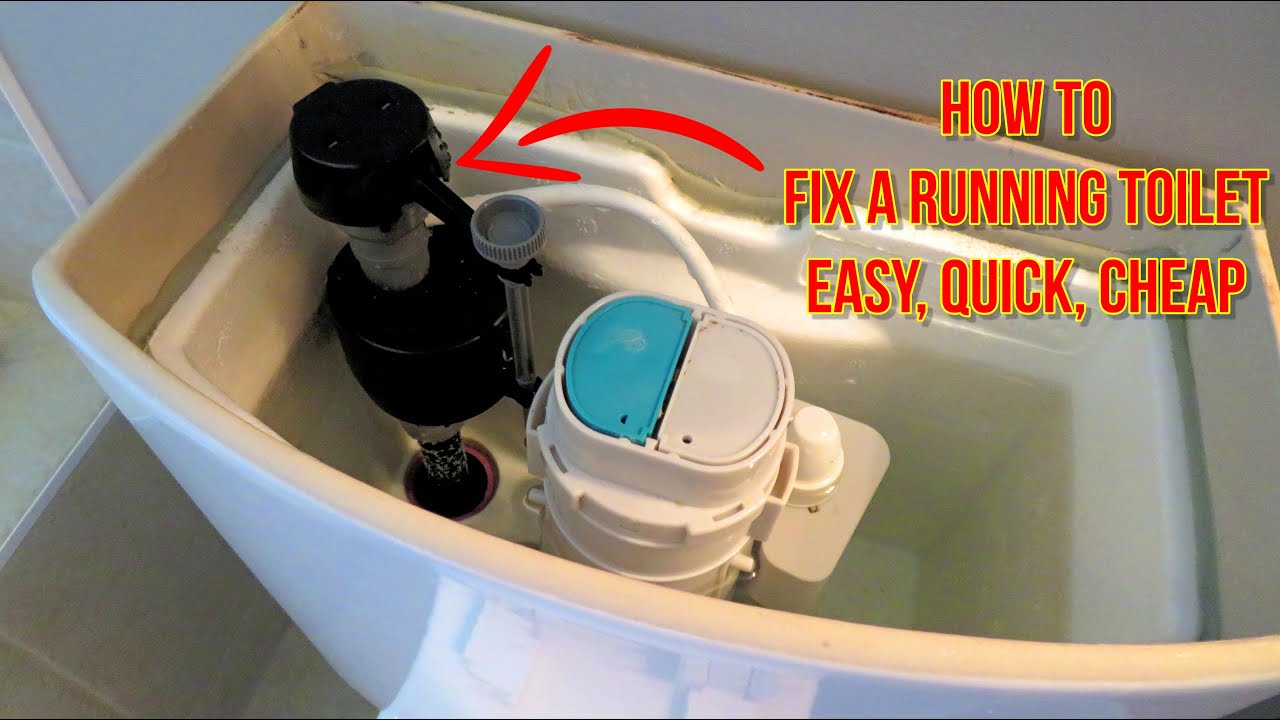
To understand the fix, it helps to understand what’s supposed to happen. Every time you flush, the flapper (a rubber seal at the bottom of the tank) lifts to let water rush into the bowl, then drops back down to seal the tank. As the tank refills, the fill valve lets water in until it reaches a set level, then shuts off completely.
A “running” toilet means that shut-off process has broken somewhere along the way. Water keeps trickling, sometimes loudly, sometimes so quietly you only notice it at night, and the tank keeps trying and failing to reach a stable, sealed state.
Three parts are responsible for nearly every case.
Three parts are responsible for nearly every case.
WHAT YOU’LL NEED
A towel and a small bucket or old rag (some water spillage is normal).
A replacement flapper and/or fill valve. Universal versions from any hardware store fit the vast majority of residential toilets.
No specialty tools required for either fix.
If you’re not sure which parts your toilet uses, a photo of the existing flapper or fill valve is usually enough for hardware store staff to point you to the right universal replacement.
STEP 1: TURN OFF THE WATER AND DIAGNOSE THE PROBLEM
Before touching anything, find the shutoff valve, usually on the wall behind the toilet, close to the floor, and turn it clockwise until it stops. Flush once to drain most of the water from the tank, then remove the tank lid and set it somewhere safe; tank lids crack easily if set down carelessly or leaned against a hard surface.
With the lid off, flush again (there will be limited water left, which is fine) and watch closely.
If the flapper doesn’t fully close after flushing, or you can see water seeping around its edges, the flapper is your problem.
If the flapper closes properly but water keeps trickling into the overflow tube, the fill valve isn’t shutting off correctly.
If the chain looks tangled or caught under the flapper, holding it open even slightly, that’s often a free fix that takes ten seconds.
STEP 2: REPLACING A FAULTY FLAPPER
Note exactly how the current flapper attaches to the overflow tube. Most use two small pegs or “ears” that hook onto either side.
Unhook the old flapper and disconnect the chain from the flush lever arm.
Hook the new flapper into the same position. Attach the chain with a small amount of slack, enough that it doesn’t hold the flapper open, but not so loose that it can tangle beneath it.
Turn the water supply back on, let the tank refill completely, and flush to test.
If the new flapper still doesn’t seal properly after a day or two, it’s very likely the wrong size or shape for your specific flush valve opening rather than a defective part. Double-check the sizing (2-inch vs. 3-inch openings are both common) before assuming something else is wrong.
STEP 3: REPLACING A FAULTY FILL VALVE
Turn off the water supply completely and drain the tank as much as possible.
Disconnect the water supply line from the base of the fill valve. Keep a towel handy, since some water will spill out even after draining.
Unscrew the retaining nut underneath the tank (you may need to reach under with one hand while holding the valve steady with the other) and lift the old valve straight out.
Insert the new fill valve. Most modern valves are height-adjustable, so set it according to the package instructions to match your tank’s dimensions.
Reconnect the supply line by hand first, then snug it with a wrench. Hand-tight plus a quarter turn is usually enough; overtightening can crack the plastic threading.
Turn the water back on slowly and watch the tank fill. It should shut off cleanly at the fill line marked inside the tank, typically about an inch below the top of the overflow tube.
If the fill valve shuts off but the water level looks noticeably too high or too low, check for an adjustment clip or dial on the valve itself before assuming you need a different part. Most allow fine-tuning without a full replacement
COMMON MISTAKES THAT CAUSE A “FIXED” TOILET TO START RUNNING AGAIN
A few small oversights account for most repeat problems.
Chain slack set incorrectly. Too tight, and the flapper never fully seats. Too loose, and it can catch underneath the flapper on the next flush.
Using a cleaning tablet that sits in the tank. Many drop-in bluing or cleaning tablets contain chemicals that degrade rubber flappers significantly faster than normal use would. A running toilet that returns every few months, despite a good-quality flapper, is often traceable to this habit.
Mineral buildup on the fill valve, especially in homes with hard water. A yearly rinse of the valve components with a diluted vinegar solution can meaningfully extend its working life.
Buying a generic flapper for a toilet that needs a brand-specific one. Some manufacturers, Kohler and American Standard in particular, use flush valve shapes that don’t seal reliably with universal flappers. If a properly-sized universal flapper still won’t hold a seal, check whether your toilet’s brand sells a matching flapper.
HOW THE FIX DIFFERS ACROSS TOILET TYPES
Not every toilet is built the same way, and it’s worth knowing which category yours falls into before you start.
Standard two-piece toilets (separate tank and bowl) are by far the most common in North American homes, and everything described above applies directly.
One-piece toilets have the tank and bowl molded as a single unit. The internal flapper and fill valve mechanisms work identically, but access can be slightly tighter. Take extra care not to over-tighten the fill valve’s retaining nut, since the tank material sits closer to the connection point.
Dual-flush toilets (common in newer, water-efficient models) use a different flush-valve mechanism, often a canister-style valve rather than a traditional flapper, that seals with a twisting motion instead of a simple hinge. Replacement canister valves are sold specifically for dual-flush systems and aren’t interchangeable with standard flappers.
Older toilets with a pull-chain or high-tank design are less common today but still exist in older homes. These typically use a similar flapper mechanism, though sourcing an exact match can take a bit more searching. Bringing the old part to a specialty plumbing supply store, rather than a general hardware store, often gets better results.
A QUICK SEASONAL MAINTENANCE HABIT WORTH BUILDING
Running-toilet problems are largely preventable with a few minutes of attention a couple of times a year.
Every six months, flush and watch the tank refill completely. Catching a slow flapper leak early is far easier than waiting for it to become a constant drip.
Once a year, especially in hard-water areas, wipe down the fill valve components to prevent mineral buildup from interfering with a clean shutoff.
After any plumbing work elsewhere in the house (like a water heater replacement or main shutoff repair), it’s worth double-checking toilets afterward. Pressure changes during other repairs can occasionally dislodge a flapper or loosen a fill valve connection that had been fine for years.
TYPICAL COST AND TIME BREAKDOWN
| Repair | Part Cost | Time Required |
|---|---|---|
| Replace flapper only | $5–$15 | 10–15 minutes |
| Replace fill valve only | $10–$25 | 15–25 minutes |
| Replace both (combo kit) | $15–$30 | 25–35 minutes |
| Professional plumber visit | $75–$150+ | — |
Given how inexpensive and quick both repairs are, it’s rarely worth paying for a service call unless the underlying issue turns out to be something more serious than a flapper or valve.
WHEN THIS ACTUALLY NEEDS A PLUMBER
This repair is genuinely DIY-friendly in the overwhelming majority of cases, but a few signs mean it’s time to call in a professional instead of continuing to troubleshoot.
The tank or bowl itself has a visible crack. No amount of internal part replacement will fix a compromised tank.
You’ve already replaced both the flapper and the fill valve, and the toilet is still running.
Water is pooling on the floor around the base of the toilet. This is a different issue entirely (usually a failing wax ring seal) and isn’t related to a running toilet.
FREQUENTLY ASKED QUESTIONS
Why does my toilet run every few minutes even though nobody has used it recently?
This is often called “phantom flushing,” and it’s almost always caused by a slow flapper leak. Water seeps past the flapper gradually enough that the tank doesn’t refill continuously. Instead, the water level drops just below the trigger point every few minutes, causing a brief, automatic refill cycle that can sound like a mini-flush.
Is a running toilet actually costing me meaningful money?
Yes, and often more than people expect. A continuously running toilet can waste upwards of 200 gallons of water in a single day. That adds up to a noticeable jump on a water bill within one billing cycle, and in areas with tiered water pricing, the cost can be disproportionately high once usage crosses into a higher pricing bracket.
Can I just jiggle the handle instead of actually fixing it?
Jiggling the handle is a temporary workaround at best, not a real fix. If jiggling the handle stops the running, it almost always means the chain or flapper is already close to failing completely. The problem will get worse over time, not better, and the “fix” will eventually stop working on its own.
How do I know if I need a 2-inch or 3-inch flapper?
Measure the diameter of the flush valve opening at the base of the tank (the hole the flapper covers) before buying a replacement. Universal flappers that adjust to fit either size are widely available and remove the guesswork if you’re unsure.
Does a running toilet mean my whole toilet needs to be replaced?
Almost never. In the vast majority of cases, a running toilet is caused by a single $5–$25 part, not a failure of the toilet itself. Full toilet replacement is rarely the right first step for this particular problem.